Minecraft emerged as one of the greatest selling games of all time and it’s not hard to understand why the bright, block-style, sandbox-survival game has become so globally iconic. Its popularity is mostly attributed to the colossal online and real-life Minecraft communities, and the thousands of mods existing for it are also an essential factor in its selling success as a video game. Minecraft comes in a multitude of media including PC games, VR, gaming consoles, and mobile platforms and this accessibility offers players ultimate freedom on how they choose to play it.
The need for privacy while gaming has led many to wonder how to make a Minecraft server. Are you an avid gamer and always wondered how to make a Minecraft server? The short answer is to use a VPS or dedicated server. While dedicated servers aren’t financially accessible to just anyone, VPS hosting solutions make it more affordable to set up a Minecraft server. In this article, we’ll walk you through the necessary steps to take to set up a Minecraft server. Let’s get started.
Table of Contents
What’s a VPS?
A virtual private server or VPS hosting environment is a completely isolated virtual compartment hosted in a shared environment. Each VPS is allocated a portion of the server’s resources and is functionally comparable to a dedicated server but in a shared environment which gives it a much lower price tag. Consider the equivalence of renting a condo as opposed to purchasing an entire house. Converting a VPS server is the answer to the question of how to make a Minecraft server.
Steps to Create a Minecraft Server on VPS
Understanding how to make a Minecraft server on VPS can be a bit intimidating, especially if you lack SSH command knowledge, however, you’ll only require a couple of basic lines and a few minutes to start hosting users, friends, or a Minecraft community on your own VPS. The following steps will guide you through the setup process of your own Minecraft server on a CentOS 7 VPS using simple SSH commands.
1. Acquire your VPS Solution
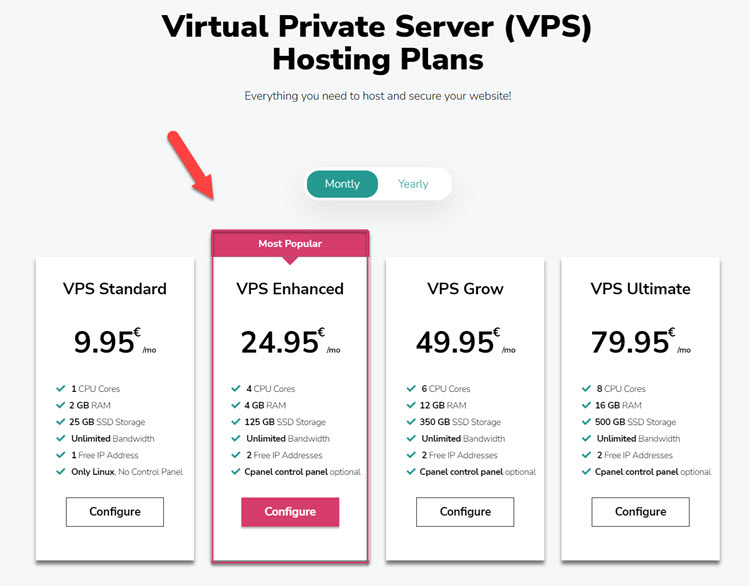
If you want to create a large Minecraft Community and host up to 24 players, Minecraft recommends using a server with a minimum of 1.5 GB of RAM and 15GB of hard drive space. Take into consideration factors like the world size, the number of players, and game upgrades (add-ons, texture packs, plug-ins, etc.) before choosing the most appropriate VPS hosting solution.
A VPS hosting solution with a Linux operation system like CentOS 7 with SSH control will be significantly less taxing on the server hardware than most other choices. Check out MonsterHost’s highly competitive VPS solutions. Our recommendation is to choose MonsterHost’s VPS Enhanced solution or one of our higher tiers when converting to a Minecraft server.

2. Install PuTTY and Log In
Once you’ve signed up for your VPS, it is time to install an SSH client to gain access to it. PuTTY is the recommended terminal simulator and you can follow the link here to download it. After the installation process is complete open PuTTY and enter your server’s IP address, then PuTTY will begin the authentication process.

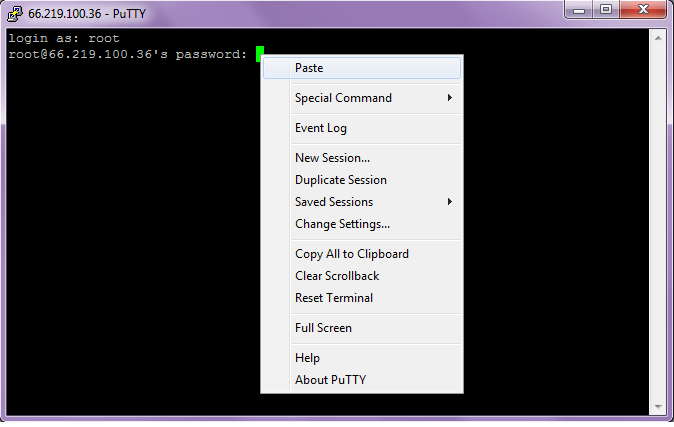
After PuTTY authenticates the IP address you will be directed to the PuTTY login screen. In the fields enter your username and password provided by your VPS host.
Important to note that PuTTY won’t show your password as you are typing it in as an enhanced security measure. Therefore, if you want to paste the password in, press CTRL+ right-click to paste it from the clipboard and then click Enter.
3. Install Java
The next step in setting up your Minecraft server is to install the Open Java Development Kit on your VPS server; this is because Minecraft runs on Java. To download Java on your VPS you will need Root Access and fortunately, all of MonsterHost’s VPS solutions come with complete root access.
To install the Java OpenJDK 8, you need to enter the following command:
yum install java-1.8.0-openjdk
4. Installing Minecraft
First, you need to Establish a Directory
Without of GUI control panel, it is easy for files and folders to become disorganized, but browsing and editing files with SSH is easily done and just requires practice. Create a directory for all Minecraft related files and folders, you can accomplish this by the following command string:
mkdir –p Games/Minecraft
A folder will be created called “Minecraft” inside a “Games” folder and you’ll be able to browse through it using the following command prompt:
cd /Games/Minecraft
Note that there are some other highly useful commands you can employ including:
- ls to pull up a directory of a specific folder;
cd to change the directory - cd . . to move up one directory; and mv file.extnewfile.ext to rename a file (this renames “file”.ext to “newfile”.ext).
Second, you need to Install Minecraft Jar
Finally, it is time to install Minecraft on the server. To install Minecraft, enter the following command:
Wgethttps://s3.amazonaws.com/Minecraft.Download/versions/1.8.8/minecraft_server.1.8.8.jar
Enter the following command to start the server:
java -Xmx1024M -Xms1024M -Djava.net.preferIPv4Stack=true -jar minecraft_server.1.8.8.jar.jar nogui
Next, you might receive a notification requesting you to agree to EULA before the server starts. To agree you’ll need to change “to” in the eula.txt file found in the install folder, use the following command:
echo 'eula-true'>eula.txt
5. Configure the Server and Ports
Opening 25565 Port
We’re closer now! The server is just about ready to go, but for players to connect to the server you need to open the 25565-port using the following commands:
firewall-cmd --zone=public --add-port=25565/tcp --permanent
firewall-cmd --reload
Configuring the Server
The “server.properties” file has all the Minecraft game options and variables you might want to modify including your Minecraft world’s name, the welcome message, number of players allowed, world size, but before that, we need to focus on your server’s IP.
To edit the above file, use the following command:
vi server.properties
Type “I” to enter insert mode, this permits you to browse using arrow keys and edit anything you like. Find server-ip then key in your server’s IP. Otherwise, use the domain name that hosts the Minecraft server. In this scenario, players can connect to your Minecraft world using www.yourdomainname.com:25565. Save and exit insert mode by pressing Escape and then type:
: wq
Installing Screen
We’re at the final step! You can launch the Minecraft server and start hosting your first set of players, however, logging out of your PuTTY session will also halt the Minecraft session. To mitigate this install Screen. Screen commands allow you to manage multiple SSH processes or connections simultaneously and independently of each other, so your Minecraft server can remain running, even after ending your VPS session.
To install Screen, type in the command:
yum –y install screen
Read, set, launch the Minecraft server on a screen by using the following command:
screen java -Xmx1024M -Xms1024M -Djava.net.preferIPv4Stack=true -jar minecraft_server.1.8.8.jar.jar nogui
There you have it! Your Minecraft server is up and running on a screen. Use CTRL+ a + d to exit the screen without closing Minecraft. Typing the command screen -r will re-open it.
To wrap up
Now you’re free to invite players to play Minecraft on your own Minecraft server!
We hope we provide you the best answer to the question of how to make a Minecraft server on a VPS hosting environment. If you require a great VPS solution for your Minecraft server, MonsterHost’s VPS solutions are scalable, robust, and immensely affordable. Get started today!


