You’ve just created your brand-new responsive site with our easy site builder tools and you’re ready to launch and promote your website. But not so fast. Have you submitted and verified your site with Google Search Console? Perhaps you’ve never heard of it or you remember its former name Google Webmaster Tools, either way, if you wish to have success with your new website and have it indexed by Google, this is a step you don’t want to miss, especially after combing your site and priming it for SEO. Here’s your guide to Google Search Console.
Table of Contents
What is Google Search Console?
If you’re familiar with Google Webmaster Tool then you may already be aware of what Google Search Console is. It was a valuable resource for many different types of operators online beyond webmasters. It was a popular choice for marketing professionals, designers, SEO strategists, business owners and app developers just to name a few.
In 2015, Google decided to rebrand and change the name to Google Search Console in a bid to be more inclusive of the diverse array of users to the platform.
For those new, to Google Search Console we’re going to start at the beginning. Google Search Console is a free service offered by Goggle, it allows you to glean a lot of information about your website and the people who visit it.
You can use it to search out things like metrics on unique site visitors daily, how they are finding it, whether these users are visiting your website on a desktop or mobile device, and which pages on your website tend to be the most popular. Google Search Console can also help you monitor your site by finding and fixing website errors, create and check a robots.txt file and submit a sitemap.
Sounds like a robust website tool, right? Well, let’s get your ready to start taking advantage of this valuable resource. Let’s get started.
How to Get Verified on Google Search Console
New to Google Search Console? Then you will first need to add and verify your website(s) before you can use any of the other features. Adding and verifying your website proves to Google that you are either the website’s owner, webmaster or another authorized user.
This verification process needs to happen to ensure that Google doesn’t hand over your sensitive information and pertinent insights about your website’s performance to the wrong person, like a hacker or cybercriminal.
Adding a website to Google Search Console is a quick and easy process.
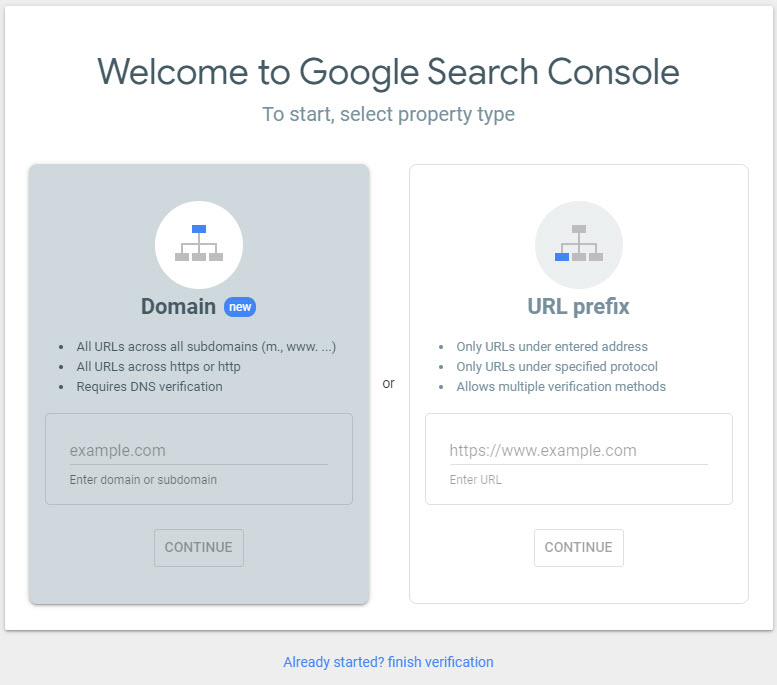
Step 1, log into your Google Search Console account, no worries your Google email account will suffice. Once you’re logged in, you will see a box with two options and a prompt to start by selecting which property you’ll like to verify. Option A: Domain and Option B: URL Prefix. Choose option B and then follow the instructions. If you have more experience then you can opt for option A and verify your domain through your domain host.

Step 2, Enter in the URL of the website you are verifying in the field provided and then click “Add Property.” And voila! Your website is now added to your Google Search Console Account.
Next, you will have to verify that the website is yours. There are several ways you can do this. The method that works best for you depends on how much working knowledge you have of HTML, if you have the authority to upload files to the website, the size of your website, and if you have Google programs connected to your website. This might sound like a lot but we’re here to help you.
Two Ways To Verify Your Website
As stated, there are multiple methods to verifying your website with Google Search Console. There are four ways Google Search Console has for website verification; here are two of the easiest ways to do it.
1. Uploading an HTML File
Google Search Console recommends completing the verification process by uploading an HTML file to your root directory. This is recommended for self-hosted websites where you can access the root directory in cPanel.
You can verify ownership of a website by uploading a special HTML file to your website. This file is secured to a specific user. Follow the instructions on the verification details page. If you remove this verification file from your website, it will cause you to lose verification for your website.
To verify ownership using an HTML file, choose the HTML file upload method on the verification details page for your site, and follow the instructions shown.
Under Recommended Verification Method, download the HTML file. Upload it to your website’s root directory. Once uploaded go back to the Google Search Console and click verify. Your site should be successfully verified by Google.
Note: Do not make any edits to the HTML file. Just upload the file as-is. If edits are made then Google Search console will be unable to verify your site.
2. Add an HTML Tag
Under other verification methods select add an HTML tag. You will add a meta tag to the HTML code of your home page in the header section.
To do this properly first copy the meta tag from Search Console, and paste it into your website’s home page on the HTML scree. The tag should go in the <head> section, before the first <body> section.
Don’t worry if there is something already in your head section. Be sure to paste the tag anywhere in the head section and be sure to save your changes. Once you’ve added the meta tag, go back to Google Search Console and click verify.
If done correctly then you will receive a message from Google stating you’ve successfully verified your website.
Conclusion
If you follow these steps carefully, you will be able to add and verify your site with Google Search Console. Now you’re ready for Google to crawl your website and gather information about it so that it can be sure to index it for search engine optimization. This is a crucial step towards your website’s success. It will make your site more available to users searching for your products and services via keywords.


