It is so easy to type in our favorite website’s domain name and in seconds we are there, scrolling through our favorite content or filling our shopping carts. Seems pretty simple, right? For us it is. However, in order for the Internet infrastructure to find a website it uses an IP address.
That’s because websites are stored using numbers (or IP addresses). These IP addresses are given an alias or domain for to make it easier for us. That’s when Domain Name Systems (DNS) steps in to match the website address you entered against the many IP addresses. Only then can the Internet display the website you requested.
What does this info about DNS have to do with hosts file? Well, DNS is like a big translation app quietly working in the background. Hosts files perform similar tasks. However, unlike DNS, hosts files reside on your computer. That means you have some control over their use. Any modification is localized, meaning that only computers within your network will be affected.
Now that we are on the same page, it’s time to learn how to use and edit Windows 10 hosts files.
Table of Contents
Using Windows 10 Hosts Files
While you can use hosts files to speed up website loading, especially for the sites you visit regularly, it is not the most efficient use of hosts files. That’s why today, we are looking on the easiest ways to use and edit Windows 10 hosts files. We will be also focusing on using hosts file to block websites, and to aid networking.
Windows 10 Hosts Files as a security feature
Blocking websites:
for various reasons you may want to prevent users from accessing particular websites on a computer. You can edit hosts files so that an error message is received when these website addresses are entered into a browser. Note that you will need to manually enter each website address you wish to block.
Hosts files hijack:
it could be the other way around, in that visitors trying to access your website are diverted to another website despite having correctly inputted your website address. Hosts files can be taken over by malicious software, and be made to do the bidding of another. This is possible because websites are stored by IP address. Hijackers can map your domain name to an IP address of their choice. To limit such an event, hosts files should be set to read-only.
Windows 10 Hosts Files in networking
Users who have virtual private server (VPS) and dedicated server packages typically work with hosts files more intimately than average computer users. This is because hosts files help with networking. Each computer on a network is a ‘host’; each computer has a ‘hostname’; and the computer currently being used is referred to as ‘localhost’.
Each computer on a network should ideally have a unique name. If there are 35 computers on a network, imagine the enormous task the system administrator will have identifying each solely by IP address. Hosts files allow system administrators to identify and communicate with individual computers within the network.
Accessing Windows 10 Hosts Files
So far, nothing has really been unique to Windows 10 hosts files. That is about to change. Before we proceed, it is important to note three things:
- Windows 10 hosts files are usually hidden files. You will need to make all files visible. There are several options to do so.
- Administrator privileges are required to edit Windows 10 hosts files.
- Despite administrator privileges, it is not possible to edit Windows 10 hosts files in situ. It is recommended that the file be copied unto the desktop where changes can be made.
To locate your Windows 10 hosts file:
My Computer >> C: Drive/Local Disk >> Windows >> System32 >> drivers >> etc >> hosts
- If ‘hosts’ is not visible at ‘etc’, change file type from ‘Text Documents (*txt)’ to ‘All Files’. File type is a drop-down menu located next to ‘File Name’.
To check readability:
- Upon locating the Windows 10 hosts file (see path above), right click
- Select ‘Properties’
- Under the ‘General’ tab is ‘Read Only’
A checked box indicates the file is read only. A read only hosts file cannot be edited.
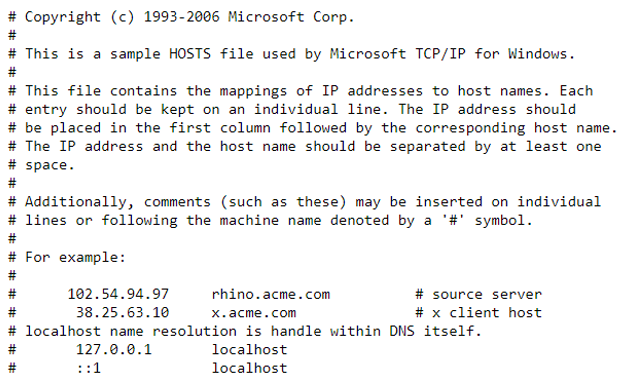
To restore Windows 10 default hosts file:
It is always good practice to backup original documents in the event of calamity. But if you didn’t, no worries!
- Click ‘Windows’ icon at bottom left of screen
- Enter ‘Notepad’ in the search bar
- Open ‘Notepad’
- Write the following text into the editor

- Save the file: File >> Save As >> name of file ‘hosts’ >> location ‘Desktop’ >> Save
- Locate the hosts folder (see path above)
- Rename the current hosts file (for example ‘hosts old’ or ‘hosts 1’)
- Drag the recently created file from desktop into this folder.
- You may be asked to enter your administrator password.
- Remove the unwanted hosts file.
- Your hosts file has now been reset to default.
Editing Windows 10 Hosts Files
What you wish to use your Windows 10 hosts file for is what will determine how you edit it. Therefore, the following is merely an overview of the editing process.
- Click ‘Windows’ icon at bottom left of screen
- Enter ‘Notepad’ in the search bar
- When the results pop up, right-click on ‘Notepad’
- Select ‘Run as administrator’
- You may receive a prompt here. This is ensuring that you do in fact wish to operate Notepad with administrator privileges. What are the odds that that very sequence of actions was random? Windows is not taking any chances.
- Click ‘File’ when Notepad opens
- Select ‘Open’
- Access the hosts file per instructions provided above
- Drag the hosts file on to your desktop for editing
- Make necessary changes
- Save changes
- Replace it with current hosts file at C:\Windows\System32\drivers\etc\hosts
Important Guidelines
When editing Windows 10 hosts files, bear in mind that:
- There is to be no extension. The file’s name is simply ‘hosts’.
- When editing Windows 10 hosts files, do not use ‘#’ to start the entry. Using ‘#’ tells Windows 10 that the instruction in this line is to be ignored. Simply write the IP address followed by the website address. These two values are to be separated by a space.
- Do not use full website addresses; that is, you should not include ‘https://’. You may begin from the ‘www’ or simply the actual domain name and extension, as in ‘www.mywebsite.com’ or ‘mywebsite.com’.
Conclusion
Remember that your computer will check your hosts file for instructions before using DNS to resolve your website address. That is why it is important that edits are carried out correctly.


